Monday, May 6, 2024

May Spellbinders Club Kits!

 The Spellbinders Club Kits are available now through May 27!  You are going to love this tropical theme that runs throughout all the kits!

For my first card I mixed the Small Dies of the Month: Tropical Friends, with the 3D embossing folder: Scattered Tropical, and used bright colors of cardstock.


supplies: white, black, and bright colors of cardstock, Tropical Friends Small Dies of the Month, Scattered Tropics 3D embossing folder, All You Need Sentiments glimmer plate and die, gold glimmer hot foil

Aren't these new goodies fabulous?!  I had such a good time playing with them.  With this embossing folder, it's easy to build your own tropical scene!  

Here's another card using it, along with a few of the Large Dies of the Month, called Grand Tropical Flamingos.


supplies: aquas, dark teal, and green cardstock, Scattered Tropics 3D embossing folder, rubbed with a teal and a green ink, leaves and flowers from Grand Tropical Flamingos, enamel dots, Hello dies from Petite Blooms and Sentiments

The Large Dies of the Month: Grand Tropical Flamingos don't disappoint either! I used another part of the set and paired them with the Stencils of the Month: Tropical Spray.


supplies: white, black, 2 shades of pink cardstock, Grand Tropical Flamingos dies, Wonderful Script Sentiments die, Tropical Splash stencils, 2 middle shades of Seashore inks, adhesive foam to pop up flamingos

I googled flamingos to see how they're colored. They get this color because they eat shrimp!  AND their knees are a brighter color than the rest of their legs!   I also found out also that a group of them is called a flamboyance!  Of course it is!  For that reason, I chose my "Hello beautiful" sentiment for this card.

The stencil this month has a very pleasing design to me, and though it's called "spray", and I took it to be water, I think it could look like leaves, too, and be very useful in all kinds of situations!  

Here's another card that uses most of the rest of the large dies for this month (you'll see a leaf and flower from the 2nd card above).  I put them against the Embossing Folder: Latticework.


supplies: desert storm, white, yellow, pinks, and teals cardstock, Latticework embossing folder, swiped with white pigment ink, leaves and flowers from Grand Tropical Flamingos, sentiment from Wendy Vecchi Vintage Florals dies

The Large Dies have a nice selection of tropical leaves, plus this large flower and the small one.


supplies: white, black, kraft, and golden yellow cardstock, Stitched Pineapple stitching dies, golden yellow embroidery floss, 3 strands, Scattered Tropics 3D embossing folder

I made my own sentiment because the pineapple is a symbol of hospitality.

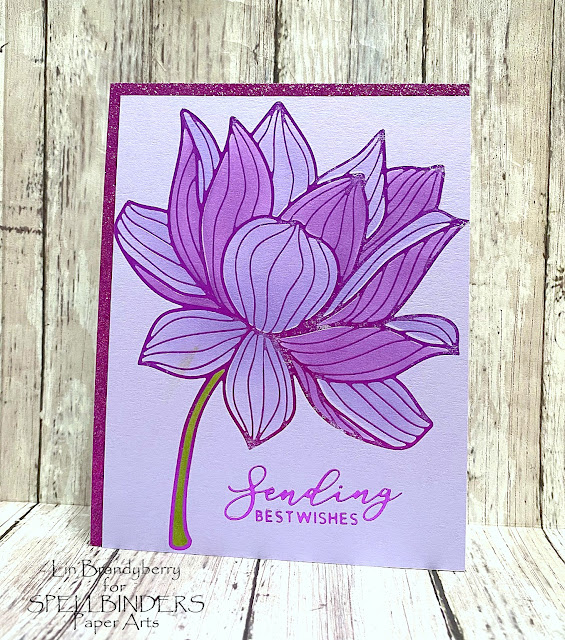
My next card features the Glimmer Plates: Tropical Bloom, and one of the TWO bonus items in the Caboodle this month, Tropical Bloom stencils to color it with!


supplies: lavendar and purple glitter cardstock, Tropical Bloom glimmer plates (includes sentiment), fuchsia flower glimmer hot foil, Caboodle Tropical Bloom stencils, 2 shades of purple and a green ink, blending brushes

I received some fuchsia flower glimmer foil, a new color to me, so I decided on a monochromatic design for this card.  After foiling and stenciling my panel, I trimmed it so that I could add some extra twinkle with a bit of glitter cardstock on the left and top of my card.  There's a 2nd sentiment in the glimmer set: Thinking of You, and cutting dies to match both sentiments.


supplies: white cardstock, Let's Get Together stamp/die set, markers to color, Latticework embossing folder, tickled pink and saltwater taffy distress inks, adhesive foam

This set also has 3 more sentiments and a smaller image to color, with dies to cut them out.

You can look HERE for information on Spellbinders Clubs.  Each is available only from the 6th until the 27th of each month.  If you click on my links under each card, you can see the specifics of each product.  You can subscribe to each of our 10 kits separately, (and you can "unjoin" a subscription at any time without any penalty), or you can get them all, saving 60% AND get the free Tropical Bloom stencils AND Betterpress Tropical Sentiments plates by choosing the Deluxe Caboodle!  


Saturday, May 4, 2024

Bluebirds of Happiness?

 I have been watching Aaron Leventhal's Hanging with Hero series, and I highly recommend it if you haven't already seen it.  The first episode was with Jennifer McGuire, and the second with Tim Holtz, and they have been so interesting, and really makes you proud to be part of this industry!  I highly recommend that you watch them.  There are more to come, also!!

Recently Simon Says Stamp had a stamp/die set on sale that has been on my wishlist, so I jumped and got it home.  Here's a card I made after watching Aaron's videos, and also being inspired by Yana Smakula's use of these same supplies.  She made her sentiments vertical, which reminded me of one of my all-time favorite Hero Arts sentiment stamps, from 2011.  So I dug it out and here's my first card with my new (to me) goodies!


supplies: white, orange, and blue cardstock, Simon Says Stamp Printmaking Birds stamps and matching dies, medium and dark blue and orange inks, sentiment from (retired) Hero Arts Made with Love, MFT Wonky Stitched Rectangle die

Following Yana's example, I stamped my sentiment to one side, then perched 1 bird on top of the vertical element and then dispersed the other birds all around it.

This stamp set consists of a set of these 8 birds in outline form, plus stamps for the bodies, the tummies, and the wings and tails.  Once you get set up, you can easily make sets of all different colors of birds, and then use the matching dies to cut them out.  I already have a bag full of 4 other different colors of birds, which I can group all together like this, or use just 1 or 2 combined with something else.  And I really like the sentiments that are included in the stamp set; since I love my birds so much, I know they'll be used lots!

Here's a 2nd card that I made after unearthing this previously stamped plaid background.  I had already stamped birds in aquas and yellows, so all I needed to do was to choose a sentiment from this set!


supplies: white and Surf Blue cardstock, Printmaker Birds and matching dies, aquas, yellows, and black inks, The Greetery Tartan Builder Diagonal layering plaid stencils, squeezed lemonade, tumbled glass, and vintage photo inks

Thanks for visiting me today - and I hope you'll take the time to watch those videos I referenced above!

Thursday, May 2, 2024

Washi Butterflies!

It's May!  

Here are a couple of cards that I made after receiving the Pink Fresh Studio Fluttering Butterflies washi and matching dies.  I have a lovely collection of their floral washi designs, and thought that these butterflies would be a nice accompaniment to them.

First I used just the elements in this set, which are lots of butterflies, along with some leafy stems.  I simply arranged them on a pierced leafy background and popped up a sentiment.


supplies: white cardstock, Memory Box Pinpoint Leaf cover plate, Pink Fresh Studio Fluttering Butterflies washi, matching dies, Perfect Sentiments foiling plate and die, gold glimmer foil, adhesive foam

Next I mixed 2 of the butterflies with a floral washi design, Hydrangea and Rose.


supplies: white cardstock, Paper Smooches (retired) Fab Frames die, Pink Fresh Studio Hydrangea and Rose washi, Fluttering Butterflies washi, and matching die, Taylored Expressions (retired) Handlettered Sentiments cling, gold embossing powder, adhesive foam

These washi tapes are beautifully designed and colored, and are a joy to work with!  Hope your day is full of joy!

Tuesday, April 30, 2024

Spellbinders Glitter Cardstock

 Spellbinders generously sent me a selection of their gorgeous glitter cardstock.  It comes in metallic colors: gold, silver, and champagne, plus deep jewel tones and sweet spring tones.  I made 2 cards.  


supplies: white, purple, Green Apple, and gold glitter cardstock, Towering Blooms dies and sentiment

These unusual floral dies were released back in November as the Dies of the Month, and I only got to use them once, so I enjoyed playing with them again, adding the glitter to small areas of the design this time.  

For my 2nd card, I let the glitter cardstocks be the star, cutting them into stripes as a background for a die-cut flower.


Love these soft spring colors!  Thanks for your visit today!

And once again I'm entering these into this week's Simon Says Stamp Wednesday challenge: Anything Goes

Sunday, April 28, 2024

Altenew April Inspiration Challenge

I need to be doing more challenges, so I found this one from Altenew, their monthly inspiration challenge.


The beautiful inspiration photo was taken at Gooch's Beach in Kennebunkport, Maine, a place that holds my heart!  We try to get to the area at least once a year.  Here's my entry, inspired by the colors, of course, and the horizontal lines..


supplies: white and slate grey cardstock, Altenew Lush Garden stamps and matching dies, Golden Sunset, Tea Party, and Rock Collection inks, sentiment die from (retired) Flower Arrangement die set, enamel dots, Spellbinders brush stroke stencil

Keep your fingers crossed for me!  And enjoy your Sunday!  I think spring has finally arrived here, and we plan to be outside as much as possible! 

Saturday, April 27, 2024

Stencil Masking

 My Favorite Things has some "Smart Masks", which can be used with stencils or stamps to give a border all around and a natural area to stamp a sentiment.  I ordered a High Low Strip masking stencil and a fun set of sentiment stamps that will fit with it, and made 3 cards today.


supplies: white cardstock, MFT Flower Fusion layering stencils, altenew mini ink cubes from Lapis Lazuli, Enchanted Garden, and Sweet Dreams collections, and Lime, MFT Smart Mask High Low StripEssential Messages 

Then I shifted the mask upward, chose a Greetery stencil set, and inked this card in warm colors.

supplies: white and bright pink cardstock, The Greetery Petal Pushers stencils, teeny bikini, melon, sunshine, firefly, and volcano lake inks, MFT High Low Strip masking stencilEssential Messages, enamel dots

And 1 more, just cause it's fun to play with colors!


supplies: white and purple cardstock, The Greetery Petal Pushers layering stencils, wilted violet,ripe persimmon, mustard seed, and mowed lawn distress inks, MFT Smart Mask High Low Strip, Essential Messages, enamel dots

These masking stencils come in 4 varieties, each in either a vertical or a horizontal perspective, and I think they're a great addition to our layering stencils and even stamps to make a card a little more interesting, yet still 1 layer!

It's an Anything Goes week at the Simon Wednesday challenge, so I'll be entering these this week.

Thanks for stopping by!

Thursday, April 25, 2024

BetterPress!!

I had been holding out investing in the BetterPress system from Spellbinders, but it is included in the current Spring Cleaning sale ending tonight at midnight, and that tipped me over!  So today I'm sharing my first attempt using this system.


supplies: pebble cotton cardstock, floral Press plate, black BetterPress ink, all included in Better Press starter kit, sentiment from Sentiments of Wonder, Zig markers, pale green cardstock as a mat

Yes, I had that "Ohhhhhh" moment when the pressed image was revealed, just like everyone else has!  I chose the pebble (pale grey) cotton cardstock included in the kit, and was so pleasantly surprised with my results!  No smudges and  a lovely crisp indention of the image, even that teensy sentiment!  And it couldn't be any simpler to achieve!!  

As I'm not good at coloring, I decided to use my Zig markers to just follow along the details of the design and add a bit of color.  They are water-based, which is what is recommended with the system.

For those of you who may wonder as I did, will this system work with our own cardstock and favorite inks?  So after I made my first printing above, I used my usual Hammermill white cardstock, Premium Color Copy Color, 100#, first with the included black ink, and then with my own VersaMark Onyx Black ink, which is my go-to black ink.  Both gave a perfect print, but there was no impression made on either attempt. In essence, the plate acted like a stamp.  That's just my experience so far, and you can make your own decision on whether you will want to use the plates   I think the amazing details that the plates can make are a plus, and don't forget that you can also use them with glimmer foil in your hot foil machine with just as crisp an image (see my results with that HERE).

Hope this will be of some help to you if you're also considering the BetterPress system. 

Wednesday, April 24, 2024

Woodblock Wednesday: Dots & Flowers

 Here's my card for this month's Woodblock Wednesday over at Amy's blog!  I chose a background stamp dated 2009 from Hero Arts called Dots & Flowers.


supplies: white cardstock, a woodgrain dp, Hero Arts S5213 Dots and Flowers woodblock, embossed in white, Memory Box (retired) Daisy Silhouette dies, natural twine, Pink Fresh Studio Perfect Sentiment stamp and matching die, Fluttering Butterflies washi tape and matching die


I'm so glad Amy is keeping her Woodblock Wednesday challenge going again this year - otherwise I'd probably just be admiring these treasures from afar!  Thanks, Amy!


Sunday, April 21, 2024

Folkart Flower Turnabout Cards

 Here's the latest Turnabout design from Concord and 9th - I can't seem to resist any of them!  I made 2 cards with it today.

For my first card, I stamped the design, then die-cut the word happy from it, added the script sentiment, and popped the panel above a solid A2 coral panel.


supplies: white, black, and coral/orange cardstock, Folkart Flower Turnabout stamps, abandoned coral, ripe persimmon, mustard seed, and mowed lawn oxide inks, (retired) MFT Happy die, Spellbinders Smooth Lines Mix and Match sentiment die, adhesive foam

I switched to cool colors for my 2nd design, and stamped a sentiment on a trimmed down panel.


supplies: white, green apple, and audrey blue cardstock, Folkart Flower Turnabout stamps, twisted citron, salvaged patina, mowed lawn, and peacock feathers oxide inks, sentiment from Harvest Wreath turnabout stamps

I love the colorful panels that you can create with these sets, and it's fun to find colors that work together.  Today I used all oxide ink colors.

Thanks for your visit today - hope you're having a great Sunday!

Thursday, April 18, 2024

Birthday Wishes

 You can never have too many birthday cards, so I pulled out some older dies and made a feminine pastel one.  The flowers and leaves were all cut from paint chips!


supplies: white and baby blue cardstock, paint chips in pinks, greens, and yellows, Altenew Garden Picks and Rose Flurries dies, PTI Scallops Mix & Mat dies, Curved Everyday Sentiments glimmer plate and die set, rose gold glimmer foil

After constructing my flowers and leaves, I arranged them and glued them to the pretty lacey panel, then lifted the whole thing above my pale blue card base.  I used rose-gold glimmer foil for my sentiment.

I really enjoyed putting this together; thanks for visiting me today!

Tuesday, April 16, 2024

Blackout Embossing Technique

 I have been wanting to try the Blackout Embossing technique where you emboss a design with your folder, turn it around so that the design is debossed, color in the details, then swipe a black ink pad over the whole thing.  It's a scary scenario, but the results I've seen have been pretty amazing.

I chose a 3D folder called Floral Harmony.  Here are my results.


supplies: white cardstock, Simon Says Stamp Floral Harmony 3D embossing folder, alcohol markers, VersaFine Onyx Black ink, Spellbinders Heartfelt Scallops die, and Curved Everyday Sentiments glimmer plate and die, black glimmer foil

It's a WOW moment when you swipe your colored image with a black ink pad!  I didn't get perfect coverage in some places - perhaps my ink is getting dry?  But it's certainly a wonderful tool for us to have to get more mileage out of our embossing folders!

If you're interested HERE is my use of this folder in the normal way.

If you've tried this, I'd love any hints you may have.  What black ink do you use?  

Thanks for your visit!

Sunday, April 14, 2024

Lilacs From Me to You

I have loved lilacs forever - they bring back so many memories of growing up, probably enhanced by their magical scent.  Here's another play with my new goodies from The Greetery.


supplies: white and periwinkle cardstock, The Greetery Botanicuts Lilacs, distress inks in shaded lilac, wilted violet, blueprint sketch, mowed lawn, and rustic wilderness, finger daubers, Spellbinders Postage Edge Rectangle, Hemstitch Rectangle, and sentiment from Curved Everyday Sentiments Glimmer Plate and die set, champagne glimmer foil

This is a set that I know I'll use for as long as I make cards!  

Thanks so much for stopping by!

Friday, April 12, 2024

Stampendous All the Sentiments Release

A few days ago Stampendous had a new release called All the Sentiments.  There are sentiment sets for sympathy cards, birthday cards, and 1 for all occasion.  Today I have 3 cards that use sentiments from 3 of these new stamp sets.


supplies: white, black, pale yellow, and pale green cardstock, All the Sentiments stamps and die set, Criss-Cross Motif 3D embossing folder, white pigment ink, a daisy die, gold enamel dot

I particularly like the font on the script sentiments in this set, and that the accompanying/finishing sentiments are in block print - makes for a nice mix! 

It's a good idea to have a set of sympathy sentiments in our arsenal, as these cards are so hard to make to begin with.  Having an appropriate sentiment is a big help!  This particular set also includes this leafy sprig stamp, too. Here I colored it a bit like a forget-me-not, and tucked it behind the sentiment.


supplies: white and pale blue cardstock, new Stampendous Sincere Sentiments, Essential Arches dies

And lastly, I mixed some sentiments with some other Stampendous pre-printed images that I fussy-cut to add to my design.


supplies: white, black, and dark coral cardstock, new Birthday Messages stamps, Hope of Spring Background (coneflowers and butterfly), Postage-edge dies

You can never have enough sentiment stamps - I hope you'll give these new ones a 2nd look!  Thanks for stopping by today.

Wednesday, April 10, 2024

Spellbinders Glimmering Flowers Release

 Spellbinders is releasing a new collection called Glimmering Flowers!  I was excited to get a little suite of products from it: a glimmer plate and stencil bundle called Glimmering Peonies and a set of glimmer sentiments and a die to cut them out called Curved Everyday Sentiments.  Here's what I did with them.


supplies: white, doll pink, and gold foil cardstock, Glimmering Peonies plate and matching stencils, Cherry Blossom and Green Valley mini ink cubes, Curved Everyday Sentiments glimmer plates and matching banner dies, Champagne glimmer foil

Peonies are everyone's favorite flowers!  I used the 5 stencils to color mine in soft pinks and greens after foiling the image using Champagne glimmer foil - I love this subtle gold!  The sentiment set has 14 different sentiments for all occasions - I know it will become a staple!  I also like that you foil 7 sentiments at a time, then use the included die to cut them apart - so much easier than foiling them one at a time!  I used the die to cut out some extra banners from gold foiled cardstock, and used 2 of them to frame up my sentiment before popping it above the panel.

This collection also includes a similar suite featuring buttercups, if you're so inclined.  I hope you'll give this collection a look!